
This The War Within 11.2 Brewmaster Monk Tank Guide explains how Brewmaster works right now in raids and Mythic Plus. Brewmaster is a mitigation tank that turns incoming hits into a damage over time effect with Stagger, then smooths and clears that damage with its brews. This guide summarizes verified information from current Patch 11.2 resources and official notes, paraphrased for clear, everyday English. Updated for Patch 11.2.
Why Play Brewmaster Monk In 11.2
Brewmaster offers very smooth damage intake through Stagger and Shuffle, strong mobility, and useful crowd control. You bring group value with Mystic Touch and control tools that help in dungeons and on adds in raids. Your damage is solid for a tank.
Tradeoffs exist. Base health is on the lower side, self-sustain without help is limited, and the toolkit can feel busy with many buttons to track. Stagger management and brew timing matter, and mistakes during dangerous boss mechanics can be punishing if cooldowns are late or charges are capped. Despite that, the spec’s smoothing makes it reliable for progression and consistent in keys.
Talents For Raids
These builds are intended as default choices when entering a raid without knowing what types of fight await and allowing you to be prepared for anything. Because of this, there may be a number of specialized talent swaps that are available at any given time. Be sure to check the “Talent Choices Explained” tab to help identify these choices and be ready to switch things around as necessary!
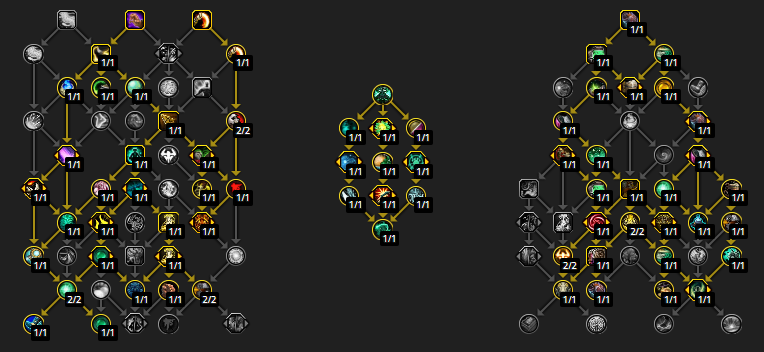
Master of Harmony Raid Default – Standard/Defensive
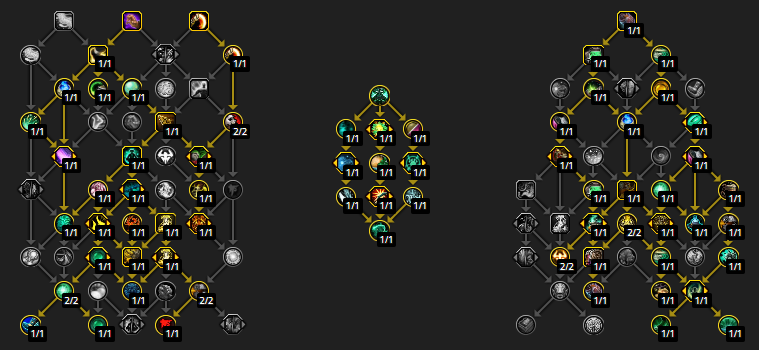
Master of Harmony Raid Default – Advanced/Offensive
Talents For Mythic Plus
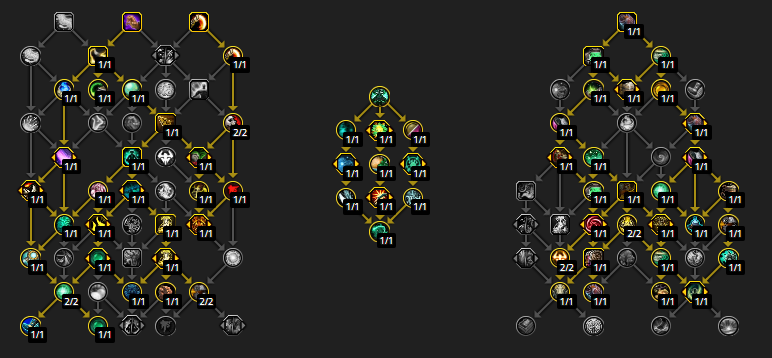
Master of Harmony – Standard
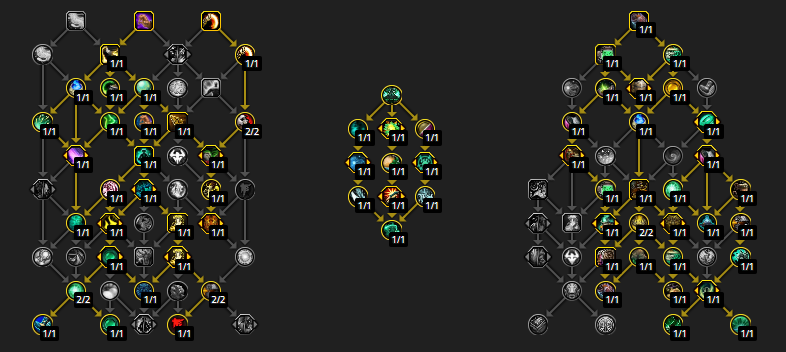
Master of Harmony – Advanced
Stat Priority In The War Within 11.2 Brewmaster Monk Tank Guide
Brewmaster stat values are close to each other in defensive use, and guidance aligns on item level first. Most up-to-date guides split priorities by defensive versus offensive focus.
Defensive priority
- Item level for Agility and Armor
- Versatility = Mastery = Critical Strike
- Haste
Notes:
- Wear your highest item level when possible. The main exceptions are jewelry slots since rings and necks do not have Agility or Armor; for those, avoid overspending on Haste if you are prioritizing defense.
- Versatility reduces damage taken and increases all damage and healing. Mastery increases your stacking dodge from Mastery: Elusive Brawler and adds Attack Power. Critical Strike increases your chance to receive extra healing via Celestial Fortune and increases the size of absorbs you receive based on your crit chance. Haste increases Energy regeneration and reduces cooldowns on key abilities, but it has the lowest defensive value.
- Diminishing returns on secondary ratings start around 30 percent for Haste and Versatility, 37 percent for Mastery, and 40 percent for Critical Strike. These thresholds do not include temporary buffs. The effect is mild; do not drop meaningful upgrades only to avoid small DR effects.
Offensive priority
- Versatility = Critical Strike
- Mastery
- Haste
Notes:
- For damage-focused gearing, Versatility and Critical Strike tend to be very close, then Mastery, with Haste trailing. If two items share the same item level, this order is a good starting point for DPS gains without sacrificing much defense.
- Different sources test with varied gear sets and may list Crit = Vers > Mastery > Haste for general play. This is in line with the offensive ordering above. If you care about small differences, compare same-level items directly with your current gear in mind.
Bottom line:
- Defensive: prioritize higher item level, then avoid stacking Haste on jewelry.
- Offensive: Versatility and Critical Strike are generally tied on value, then Mastery, then Haste.
- Guidance varies slightly across sources, but the common ground above is consistent for Patch 11.2.
Best In Slot Gear For 11.2
Overall Brewmaster Monk Best in Slot Gear
Best in Slot Gear from Manaforge Omega
| Slot | Item | Source |
| Head | Catalyst | Raid | Vault | |
| Neck | Soulbinder Naazindhri | |
| Shoulders | Catalyst | Raid | Vault | |
| Cloak | ||
| Chest | Catalyst | Raid | Vault | |
| Wrist | Soulbinder Naazindhri | |
| Gloves | Catalyst | Raid | Vault | |
| Belt | Nexus-King Salhadaar | |
| Legs | Nexus-King Salhadaar | |
| Boots | The Soul Hunters | |
| Ring 1 | Plexus Sentinel | |
| Ring 2 | Dimensius | |
| Trinket (Hybrid) | The Soul Hunters | |
| Trinket (Damage) | Fractillus | |
| Trinket (Defense) | Soulbinder Naazindhri | |
| Weapon (2h) | Forgeweaver Araz | |
| Weapon (1h) | Dimensius | |
| Weapon (1h) | The Soul Hunters |
Best in Slot Gear from Mythic+
Enchants
| Slot | Best Enchant |
| Weapons (2h/Dual-Wield, Offense) |  |
| Weapons (2h/Dual-Wield, Defense) | |
| Cloak | |
| Chest | |
| Bracers | |
| Legs | |
| Boots | |
| Ring (Offense) | |
| Ring (Defense) | |
Consumables
| Type | Best | |
| Flask | |
|
| Combat Potion | |
|
| Health Potion | |
|
| Weapon Buff | |
|
| Food | (Hearty) (Hearty) |
|
| Diamond | |
|
| Other Gems | |
Rotation And Cooldowns Overview For The War Within 11.2 Brewmaster Monk Tank Guide
Brewmaster’s gameplay centers on three pillars:
- Keep Shuffle up by pressing Keg Smash and Blackout Kick.
- Manage Stagger with Purifying Brew and your main active defensive, Celestial Brew or Celestial Infusion.
- Press high-value buttons on cooldown while maintaining threat and control.
Opener
Goals at pull:
- Establish Shuffle early and maintain it.
- Apply your damage and debuff tools.
- Build Purified Chi through Purifying Brew timing to empower Celestial Brew or Celestial Infusion.
Example opener flow:
- Pre-pull, place Transcendence in a safe spot for repositioning.
- Keg Smash on pull as your first hit connects.
- Blackout Kick.
- Rushing Jade Wind if talented and not already active.
- Rising Sun Kick on cooldown if taken.
- Breath of Fire if talented and aligned with Keg Smash windows.
- Tiger Palm to help reduce brew cooldowns if you have Energy and nothing higher priority is up.
- Use Purifying Brew in response to an actual hit ramp to start building Purified Chi rather than pressing on cooldown into trivial damage.
- Activate your main defensive (Celestial Brew or Celestial Infusion) on real threats, not before the first hit if unneeded.
Keep Keg Smash and Blackout Kick rolling. Do not chase a perfect script at the expense of Shuffle uptime or brews.
Single Target Priority
- Keg Smash on cooldown.
- Blackout Kick on cooldown.
- Rushing Jade Wind if talented, keep running.
- Rising Sun Kick on cooldown if talented.
- Exploding Keg on cooldown for damage and mitigation value.
- Breath of Fire if talented and aligned after Keg Smash windows.
- Fillers: Tiger Palm to reduce brew cooldowns; use Spinning Crane Kick only if it beats Tiger Palm based on talents and target count.
- Purifying Brew when your Stagger level spikes from actual damage, and avoid capping charges.
- Celestial Brew or Celestial Infusion proactively into threatening mechanics, not just on cooldown. Do not sit on charges if danger is frequent.
Notes:
- If playing talent buffs that change the order (for example, Blackout Combo interactions), follow your build’s priorities when those procs or buffs are active.
- Touch of Death is a DPS and defensive tool. Use it when a target is about to die and you can safely gain the Stagger clear effect without missing more important defensive timing.
AoE And Cleave Priority
- Maintain Keg Smash, it drives threat, damage, and brew cooldown reduction.
- Keep Rushing Jade Wind up if talented for easy threat and damage.
- Blackout Kick on cooldown; with Shadowboxing Treads, it cleaves and gains value on packs.
- Exploding Keg on cooldown; it greatly boosts AoE pressure and adds short mitigation by forcing melee to miss briefly.
- Breath of Fire if talented; keep it up in Keg Smash windows to trigger talent synergies.
- Rising Sun Kick on cooldown if talented (still high priority even in AoE in many builds).
- Spinning Crane Kick as your AoE filler at high target counts when it outweighs Tiger Palm, watching your Energy so you do not starve core buttons.
- Purifying Brew in response to heavy incoming damage. Consider double purifying back to back after a large hit to drop to a safer Stagger level if you have charges.
- Use Celestial Brew or Celestial Infusion proactively on large pulls; do not hold it so long that you waste cooldown reduction value from your rotation.
Cooldown Usage
- Celestial Brew or Celestial Infusion
- This is your main active defensive. Celestial Infusion provides a smoother, longer absorb window that scales with Purified Chi. Time it into predictable boss or trash spikes. Do not sit on charges; use it frequently on dangerous hits.
- Fortifying Brew
- Your long cooldown “big wall” increases max health and reduces damage taken. Use early in a tough fight so it benefits from cooldown reduction and can come back later, unless a specific mechanic requires it.
- Diffuse Magic
- Use against dangerous magic hits and heavy DoTs. It also self-dispels and can reflect certain effects. Treat it as your first choice for large, predictable magical damage.
- Dampen Harm
- Reduces large single hits more than many small hits. Use it for big tankbusters or bleed spikes when other tools are down.
- Exploding Keg
- Strong offensive cooldown with a short safety window by making melee miss. Use on cooldown for damage and to reduce spike risk at the start of big packs.
- Purifying Brew
- Spend charges when Stagger spikes or when Purified Chi is about to expire, and avoid capping. After very large hits, double purify can be justified to reset to a safer level.
- Invoke Niuzao, the Black Ox and related nodes if talented
- Current updates shift Niuzao to interact with Purifying Brew and Stagger. Use on big pulls or heavy boss windows to translate your mitigation into damage while increasing control.
- Hero talent cooldowns and tier effects
- Shado-Pan builds revolve around Flurry Strikes windows and their synergy with your major cooldown. Master of Harmony builds revolve around Vitality storage and Harmonic Surge procs, with Celestial Brew or Celestial Infusion guaranteeing surges under the 4-piece set. Use these effects on cooldown unless you must hold for a known burst window.
General timing tips:
- Do not overlap big defensives unless required. Stagger smoothing works best when you layer tools over time.
- For long boss fights, use your big cooldowns early so cooldown reduction from your rotation helps bring them back.
- Press something for each dangerous mechanic. If your main wall is not ready, use your next best tool rather than taking a raw hit.
Utility And Defensive Tools For The War Within 11.2 Brewmaster Monk Tank Guide
- Ring of Peace: Zone control in dungeons and add waves. Use to knock back or deny danger zones, or to control patrols. Excellent for interrupting uninterruptible casts that require movement.
- Leg Sweep: Short area stun. Plan for caster packs, dangerous ambushers, or to line up interrupts on grouped trash.
- Paralysis: Single-target stop. Use on problem mobs to delay dangerous casts, out-of-combat sap for skips, or to separate bolstering targets in keys.
- Spear Hand Strike: Interrupt. Track priority casts and use it early in a stop chain when needed.
- Tiger’s Lust: External movement and root break. Free allies from slows or roots and speed them up for mechanics or kiting.
- Transcendence and Transcendence Transfer: Place before pulls or during phases to reposition quickly or escape danger. This is key for bait mechanics and for returning after knockbacks.
- Roll: General mobility for baiting, dodging, and kiting. Pair with Transcendence setups.
- Detox: Dispel poisons and diseases. Outside raids, many dungeon packs have dangerous dispellable effects.
- Provoke: Taunt with an added move speed toward you if talented. Use to quickly reposition enemies to your controlled area.
- Expel Harm: On-demand self-heal that benefits from Attack Power and converts orbs if talented. Use between spikes; do not rely on it as your only sustain during heavy tankbusters.
- Mystic Touch: Physical damage debuff for your group. Maintain uptime naturally by hitting targets.
Defensive staples you will press often
- Shuffle: Passive buff refreshed by Keg Smash, Blackout Kick, and Spinning Crane Kick. This amplifies Stagger and is the backbone of your mitigation. Prioritize actions that keep Shuffle up at all times.
- Stagger and Purifying Brew: Monitor Stagger levels and purify smartly. The best value is after new heavy damage lands. Avoid sitting on two charges.
- Celestial Brew or Celestial Infusion: Treat as proactive tools into known burst windows. Celestial Infusion emphasizes smoothing over a longer period.
Tips And Common Mistakes
- Do not cap Purifying Brew charges. Press it when Stagger spikes or when Purified Chi is about to expire to maintain absorb strength for Celestial Brew or Celestial Infusion.
- Keep Shuffle up. If you are forced out of melee during mechanics, plan a safe re-entry with Transcendence or Roll so the buff does not drop before the next hit.
- Use Exploding Keg proactively on big pulls to reduce early melee spike risk.
- Press Diffuse Magic and Dampen Harm for the right damage type. Diffuse for magic hits and dangerous DoTs; Dampen for large physical or mixed hits.
- Do not sit on Celestial Brew or Celestial Infusion. Use frequently into real threats; charges and cooldown reduction encourage proactive use.
- Set Transcendence before high-movement phases or knockbacks to stabilize positioning.
- Plan Ring of Peace and Leg Sweep with your team. Overlapping stops wastes control on dangerous packs.
- In AoE, maintain Rushing Jade Wind if talented for passive threat, then weave core buttons. Do not spam Spinning Crane Kick so hard that you starve Keg Smash.
- Use Touch of Death near the end of packs or on add phases for both damage and the Stagger clear, but never at the expense of a needed defensive press.
- If playing with talent nodes that change priorities, follow those windows rather than forcing a static sequence.
Recent Tuning And Update Notes
Patch 11.2 includes multiple Brewmaster updates. New defensive options such as Celestial Infusion offer a longer, smoother absorb period as an alternative to the shorter burst of Celestial Brew. Niuzao’s Resolve changes Gift of the Ox orbs into a heal over time that scales with missing health. Zen State increases Stagger strength based on missing health. Together these options allow more control over smoothing and make mitigation more customizable.
Niuzao-related talents were redesigned. Invoke Niuzao and Walk with the Ox now interact more directly with Purifying Brew, translating your mitigation and purification into damage and utility. Improved Invoke Niuzao adds a recast stomp for extra disruption once per summon. Face Palm was adjusted so every Tiger Palm triggers it at reduced effect, smoothing resource and cooldown reduction flow. Vivacious Vivification now procs off Rising Sun Kick, aligning instant Vivify use with active combat. Outdated nodes such as Zen Meditation and Celestial Flames were removed in this patch cycle.
Hero talents affect rotation and tier set bonuses. Shado-Pan ties your windows to Flurry Strikes and your major hero cooldown, reinforcing burst sequences in keys and fights with frequent add waves. Master of Harmony builds around Vitality storage and Harmonic Surge procs, with Celestial Brew or Celestial Infusion guaranteeing surges under the 4-piece, creating clear damage and mitigation beats to plan around.
Conclusion
This The War Within 11.2 Brewmaster Monk Tank Guide highlights how to set up, survive, and contribute damage using today’s tools. Focus on Shuffle uptime, timely purifies, and proactive use of Celestial Brew or Celestial Infusion. Layer Diffuse Magic, Dampen Harm, and Fortifying Brew for the right mechanics, and use Ring of Peace, Leg Sweep, and Paralysis to control packs. Stat choices are close defensively; favor item level, then follow the priorities noted above. Details may shift with future updates, but the principles and priorities here reflect Patch 11.2.