
Windwalker Monk is a fast melee DPS that converts Energy into Chi and spends Chi on hard-hitting abilities. The spec rewards clean ability sequencing through Mastery: Combo Strikes and uses flexible cooldown windows to deliver burst on demand. This The War Within 11.2 Windwalker Monk DPS Guide summarizes verified, current 11.2 information from reputable class guides and official notes. Last updated: August 2025, Patch 11.2.
In raids, Windwalker brings strong target swapping, frequent burst windows, and excellent mobility. In Mythic Plus, the spec scales well with multiple targets and plays comfortably in high movement dungeons. Most builds pivot around Shado-Pan or Conduit of the Celestials hero talents. Talent changes and tuning in 11.1 and 11.2 raised the value of Mastery and Haste and shifted some AoE patterns with Spinning Crane Kick improvements.
Why Play Windwalker Monk In 11.2
Windwalker offers a flexible toolkit with practical strengths:
- Mobility and control. Roll, Transcendence, Tiger’s Lust, and short cooldown crowd control help you stay on targets and handle mechanics.
- Flexible burst windows. You can set up 90 second or 2 minute cycles depending on content and talents. This makes it easier to hit add waves or boss timers.
- Clean target swapping. You lose little damage when switching, and your best buttons remain available as cooldowns reset.
- Strong AoE tools. Spinning Crane Kick and cleave talents deliver reliable multi target damage, with channeling behavior adjusted in 11.2 to allow certain casts during the channel.
- Build variety. You can tailor your setup for single target, cleave, or Mythic Plus, and choose between hero talents that favor different damage patterns.
Tradeoffs to note:
- No full immunity. You rely on active mitigation and movement to survive heavy mechanics.
- Combo Strikes discipline. Repeating the same ability back to back loses Mastery value and punishes sloppy sequencing.
- AoE burst profile changed. Without older stacking effects, your burst AoE looks different than in previous seasons; sustained and planned windows matter more.
Talent Tree For The War Within 11.2 Windwalker Monk DPS Guide
Best Shado-Pan Talents For Raids
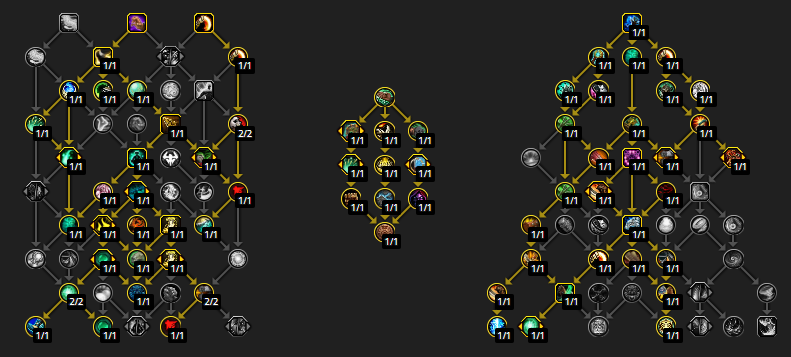
Copy Shado-Pan Talents For Raids – C0QAAAAAAAAAAAAAAAAAAAAAAMzsMAmZMLzMmZGAAAAAAAAAAAssMMiZGYGGWMzYbmZGmthZwyMBAwyMzgZG2mBAwGA0sMLNzMzCgZA
Best Windwalker Monk Mythic+
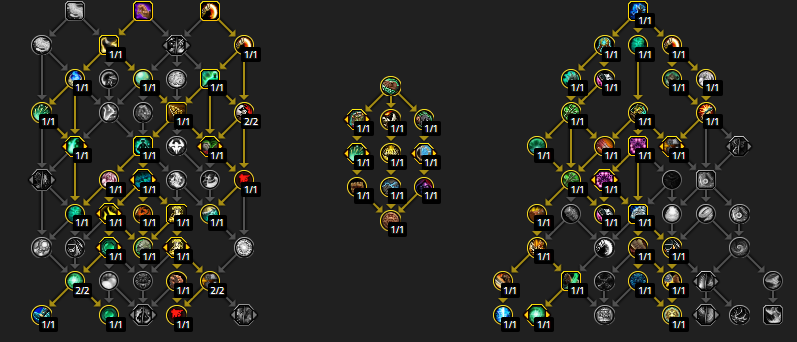
Copy Best Windwalker Monk Mythic+ – C0QAAAAAAAAAAAAAAAAAAAAAAMzYAMzM2mZMzMDAAAAAAAAAAALLDjYmhxMMswM2mZmhZjZGsMTAAsMmhZmhtZAAsBANLzSzMzsAYG
Stat Priority For The War Within 11.2 Windwalker Monk DPS Guide
Current 11.2 guidance agrees on the overall structure with small variations by gear:
- Weapon Damage
- Agility
- Mastery = Haste
- Versatility = Critical Strike
Notes:
- Agility is your primary stat and scales the damage of your abilities.
- Mastery: Combo Strikes rewards not repeating abilities, so builds and rotation choices that let you alternate cleanly increase Mastery’s value.
- Haste speeds up your flow and reduces key cooldowns, improving button frequency and reducing empty globals.
- Versatility and Critical Strike typically sit behind Mastery and Haste for most raid and Mythic Plus setups at current item levels.
- Diminishing returns apply to secondary ratings at higher values. If one stat is far ahead on your gear, shift future choices into the next best secondary to avoid waste.
Best In Slot Gear The War Within 11.2 Windwalker Monk DPS Guide
Overall Windwalker Monk Best in Slot Gear
Best in Slot Manaforge Omega
Best in Slot Mythic+
| Slot | Item | Source |
| Head | Catalyst | |
| Neck | Halls of Atonement | |
| Shoulders | Catalyst | |
| Cloak | ||
| Chest | Catalyst | |
| Wrist | ||
| Gloves | Catalyst | |
| Belt | ||
| Legs | Eco-Dome Al’dani | |
| Boots | Priory of the Sacred Flame | |
| Ring | Halls of Atonement | |
| Ring | Eco-Dome Al’dani | |
| 2H Weapon | Ara-Kara, City of Echoes | |
| Trinket | Eco-Dome Al’dani | |
| Trinket | Operation: Floodgate |
Enchants
| Slot | Best Enchant |
| Weapon |  |
| Cloak | |
| Chest | |
| Bracers | |
| Legs | |
| Boots | |
| Ring | |
Consumables
| Type | Best |
| Flask | |
| Combat Potion | |
| Health Potion | |
| Weapon Buff | (yes really) |
| Augment Rune | |
| Food | |
| Diamond | |
| Other Gems | |
Rotation And Cooldowns Overview
Windwalker’s damage plan is a priority system that respects Mastery: Combo Strikes. Do not press the same ability twice in a row unless you have a planned reason. Keep your core spenders on cooldown, align your burst windows, and swap between single target and AoE tools based on the number of targets.
Opener
- Pre pull. Place Transcendence in a safe location if the fight has knockbacks or long movement. Get in melee to tag Mystic Touch early.
- On pull. Build Chi with Tiger Palm, then press Strike of the Windlord if talented, Rising Sun Kick, and Fists of Fury on cooldown. Fit Whirling Dragon Punch when available after FoF and RSK have both been used. Use Blackout Kick as filler to avoid Chi cap and to keep Combo Strikes clean.
- First window. Activate Storm, Earth, and Fire or Serenity when your key spenders are coming up together. Use Invoke Xuen, the White Tiger and on use trinkets inside that window.
Single Target Priority
- Keep Rising Sun Kick and Fists of Fury on cooldown.
- Use Strike of the Windlord as a high priority nuke when available.
- Press Whirling Dragon Punch when both RSK and FoF are on cooldown and you have the talent.
- Use Blackout Kick as your main filler to spend Chi and to maintain a clean Combo Strikes chain. Do not repeat the same ability back to back unless the plan demands it.
- Use Tiger Palm to convert Energy into Chi without capping. Avoid pooling so high that you delay RSK or FoF.
- Use Touch of Death when eligible.
- Maintain planned cooldown cycles. If you are playing a 90 second plan, do not drift Storm, Earth, and Fire so far that it desyncs from your main spenders.
AoE And Cleave Priority
- In cleave and AoE, continue to keep RSK and FoF on cooldown. They remain high priority across target counts.
- Use Spinning Crane Kick as your main AoE spender. With current tuning and changes to its behavior, it is a reliable press that fits cleanly between your core buttons.
- Fit Strike of the Windlord and Whirling Dragon Punch on cooldown as part of your AoE flow.
- Use Blackout Kick to keep Combo Strikes intact and to spend excess Chi without capping.
- Keep Tiger Palm in the mix for Energy to Chi flow. Avoid Energy cap while setting up your next round of spenders.
- In Shado-Pan focused builds, pay attention to energy spending patterns that feed hero talent effects in big pulls.
- In Conduit of the Celestials setups, consider where Slicing Winds and Heart of the Jade Serpent windows fall relative to your planned AoE bursts.
Cooldown Usage
- Storm, Earth, and Fire or Serenity. Choose one based on your build. Line it up with RSK, FoF, and Strike of the Windlord so your window includes multiple big presses. Avoid over drifting these cooldowns; a slightly early use to meet add spawns is often better than a perfect sim window that misses the fight.
- Invoke Xuen, the White Tiger. Use inside your main window for maximum overlap with your highest damage buttons. With talent support, plan its timing to match boss timers or priority add waves.
- Touch of Death. Use on cooldown when the target qualifies to add a hard hit into your plan. Save for priority targets if needed.
- Hero talent specifics.
- Shado-Pan. Your energy spending drives Flurry Strikes cadence. During cooldowns, alternating Tiger Palm between main spenders supports energy goals and keeps Combo Strikes clean.
- Conduit of the Celestials. Heart of the Jade Serpent windows come from specific actions. Avoid overlapping certain Heart windows that overwrite value, and align Strike of the Windlord and Slicing Winds to feed your best sequences.
Utility And Defensive Tools
Windwalker has a broad toolkit that helps your group survive and control the field:
- Touch of Karma. Redirects damage taken into your target for a short time. Use proactively to survive heavy hits and to convert that pressure into damage.
- Diffuse Magic and Dampen Harm. Versatile personal defensives that cover magic and mixed hits. Use on timers that threaten you or to avoid burning healthstones and externals.
- Fortifying Brew. A larger defensive for scripted high damage moments or if you must stay in dangerous melee to finish a kill.
- Spear Hand Strike. Reliable interrupt on a short cooldown. Coordinate with your group to cover chains.
- Leg Sweep. AoE stun for dangerous packs and add waves. Time it with your group’s stops and pull sizes.
- Ring of Peace. Displacement ring that lets you peel, reposition packs, or deny dangerous ground. Use to protect casters or to control funneling space in tight areas.
- Paralysis. Single target stop for priority casts or to isolate a mob before a pull.
- Tiger’s Lust, Roll, and Transcendence. Mobility and freedom tools for kiting, target swaps, and safe repositioning during mechanics.
- Detox. Cleanses Poison and Disease effects in dungeons that require frequent dispels.
- Mystic Touch. Your damage applies a physical vulnerability. Tag targets early to support your group’s physical or mixed damage dealers.
Tips And Common Mistakes
- Do not break Combo Strikes. Avoid repeating the same ability back to back unless you have a clear reason. This is the most common and costly mistake.
- Keep big spenders on cooldown. Rising Sun Kick, Fists of Fury, and Strike of the Windlord do most of the work. Do not delay them for minor alignment unless the encounter plan demands it.
- Do not cap Energy or Chi. Use Tiger Palm and Blackout Kick to maintain flow and avoid waste.
- Do not over channel or clip Fists of Fury without purpose. Finish channels unless you must stop for a critical mechanic or to secure a higher value cast.
- Plan your windows. Stick to your chosen 90 second or 2 minute cadence so cooldowns overlap cleanly. Use timers to meet add spawns.
- Use Spinning Crane Kick smartly. Fit it as your AoE spender between core buttons rather than as a panic filler.
- Save defensives for scripted damage. Touch of Karma, Diffuse Magic, and Dampen Harm are powerful when planned, not just when reactive.
- Keep Mystic Touch up. Tag new enemies quickly so the group’s damage benefits.
Recent Tuning And Update Notes
11.2 highlights
- No direct core spec rework landed in 11.2, but Spinning Crane Kick behavior was reverted to allow using certain abilities during its channel. This improves flexibility in movement and utility without dropping DPS channels.
- Vivacious Vivification in the class tree was redesigned to grant an instant Vivify after casting Rising Sun Kick. This is a small quality of life change that does not alter your main DPS plan.
- Season updates introduced a new raid and Mythic Plus rotation, the Reshii Wraps artifact cloak, and hero talent based tier set bonuses that shape your gameplay. Shado-Pan set effects accelerate Flurry Strikes patterns, while Conduit of the Celestials set effects extend Heart of the Jade Serpent windows and add Haste.
Earlier tuning
- Several baseline and talent specific buffs were applied late in the previous patch cycle, increasing Fists of Fury, Blackout Kick, and related effects. These changes pushed more value into Blackout Kick supporting talents and improved overall consistency across builds.
As always, encounter design and weekly dungeon affixes influence talent choices and how tight you aim your cooldown windows. When patch notes adjust a talent’s damage or cooldown behavior, expect small shifts in which nodes you pick, but your core priority system remains the same.
Conclusion
This The War Within 11.2 Windwalker Monk DPS Guide gives you a clear, practical plan for raids and Mythic Plus. Keep Rising Sun Kick, Fists of Fury, and Strike of the Windlord on cooldown, respect Mastery: Combo Strikes by not repeating abilities, and commit to either a 90 second or 2 minute cycle so your cooldowns overlap cleanly. In AoE, lean on Spinning Crane Kick and fit it between your main buttons. Use your mobility, control, and defensives proactively to maintain uptime and survive pressure. Details can change as future updates land, and the guidance here reflects current 11.2 information.